How to enjoy a pallet pool, hopefully it doesn't explode!
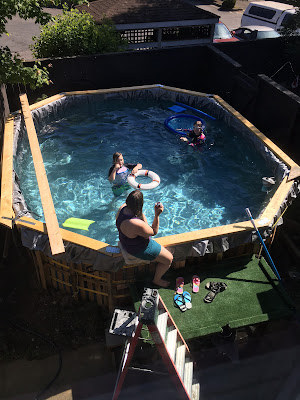
I came home from work on a fairly warm day. I walked in the door and immediately noticed my family was in the pool! The many hours of hard work had come to fruition!
Things are not quite done, but I was happy that my family could enjoy the pool. It was barely warm enough but a couple of hot days had helped. Our friend had helped us with the chemicals (shock the water, chlorine, etc) and it was amazing how nice the water looked after having a greenish tinge for quite awhile. The pump/filter was now on a timer. It pumps when the sun is out, runs the water through the filter, then through 130 feet of black hose (which I am planning to put on the roof soon), and back into the pool on the opposite side. I made a bit of a step to get in, but that needs more work... I laquered the 2x6 frame so it hopefully lasts longer... we ordered a solar cover but also need to set up a crank for it... and lots of clean up around the outside so that we can enjoy the space a bit more. And what do you know, Covid restrictions are starting to ease, so maybe we can invite a few people over soon to enjoy it with us.
The depth ended up being 49 inches of water. It's perfect for my kids--they can touch, but also swim without feeling like they are in a kiddie pool.
It definitely felt good to swim in my backyard!
Saturday, 5 June 2021
Pallet Pool, Part 3
How (not) to build a pallet pool, part 3...Issues!
Once the pool was half full, some issues started to present. The sides started to bow out a fair amount. I screwed on a 2x4 and then a 2x6 perpendicular to that. It did help, but some of the screws simply broke from the stress, especially as we filled it some more. Also, the bottom pushed out in one spot where it wasn't inset in the ground much due to gate access.
The more water that went in, the more pronounced these issues became. Next, my pump pipe started leaking.
There was only so much tightening to be done. I ended up fixing it with silicone tape on the outside, and marine putty on the inside.
As we got closer to 4 feet deep, I bought another strap to go around the middle to help with the bulging.
We went to the pool supply store to get some chemicals. They tested our water there and told us what to buy. We had to calculate how many litres of water we had. I couldn't believe it when we came up with 20,000 Litres, but that's what it is. Guess how much a litre of water weighs? 1 kg. We had ourselves a 44,000 pound backyard paperweight. The bulging sides worred me. But the tarp seemed to be holding up just fine.
Pallet Pool, Part 2
How to (not) build a pallet pool...part 2...
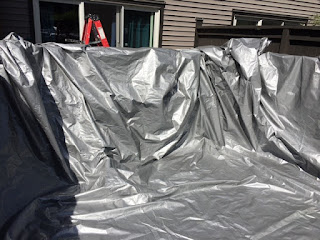
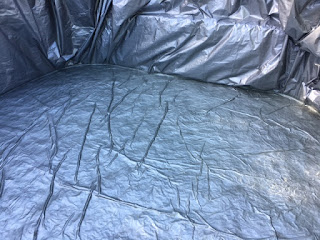
Now that my pallets were in place, in a 16 foot by 12 foot octagon, I thought the pool needed a ledge (bench). As we were planning to have it decently deep, it would be a good place to sit and rest, or get in when it was cold, etc. I used an old 2x12 for the top and some extra OSB for the side. I reinforced the back with a few landscape ties and lots of extra dirt. Next I bought some shipping straps. The circumference of the pool is about 52 feet, so I bought a 30 foot strap and a 27 foot strap and joined them together. I bought 2" wide straps at Canadian Tire. They said they were rated for 3333 pounds with 10,000 lb. breakage, so I figured that should be plenty. I put one set at the top, and one at the bottom, and ratcheted them up snug. As the ratchets were sticking out a bit, I loosened them a notch--not realizing that they could keep slipping that way. Oops. First big mistake... ...and first big expense. Next was to buy a heavy duty tarp. Pond liner would be $900 and weigh 300 lbs. Hmm. I was also quoted $1200 for a large tarp. Hmm. Bought a 30x60 unused heavy duty tarp on Craigslist for $160. It said Waterproof. Good enough. But just in case, I cut it in half and doubled it up! Now, the moment we had all been waiting for! Turn on the hose! We needed to fill it a little to let the tarp settle. I was surprised at how fast the weight of the water kept the tarp from moving. There were a few creases on the ground that I couldn't smooth out after only an inch or two of water. Next I looked for a filter on Craigslist and got this one for $120. It has a cartridge. It didn't come with any connectors or pipes though, so I had to spend about the same amount to get set up with PVC pipe, cement, and a shower drain...and also figure out a way to adapt the output to a garden hose for our solar heater. Now with the water half full, Malachi braved the cold and splashed around a bit. Brr!
Now that my pallets were in place, in a 16 foot by 12 foot octagon, I thought the pool needed a ledge (bench). As we were planning to have it decently deep, it would be a good place to sit and rest, or get in when it was cold, etc. I used an old 2x12 for the top and some extra OSB for the side. I reinforced the back with a few landscape ties and lots of extra dirt. Next I bought some shipping straps. The circumference of the pool is about 52 feet, so I bought a 30 foot strap and a 27 foot strap and joined them together. I bought 2" wide straps at Canadian Tire. They said they were rated for 3333 pounds with 10,000 lb. breakage, so I figured that should be plenty. I put one set at the top, and one at the bottom, and ratcheted them up snug. As the ratchets were sticking out a bit, I loosened them a notch--not realizing that they could keep slipping that way. Oops. First big mistake... ...and first big expense. Next was to buy a heavy duty tarp. Pond liner would be $900 and weigh 300 lbs. Hmm. I was also quoted $1200 for a large tarp. Hmm. Bought a 30x60 unused heavy duty tarp on Craigslist for $160. It said Waterproof. Good enough. But just in case, I cut it in half and doubled it up! Now, the moment we had all been waiting for! Turn on the hose! We needed to fill it a little to let the tarp settle. I was surprised at how fast the weight of the water kept the tarp from moving. There were a few creases on the ground that I couldn't smooth out after only an inch or two of water. Next I looked for a filter on Craigslist and got this one for $120. It has a cartridge. It didn't come with any connectors or pipes though, so I had to spend about the same amount to get set up with PVC pipe, cement, and a shower drain...and also figure out a way to adapt the output to a garden hose for our solar heater. Now with the water half full, Malachi braved the cold and splashed around a bit. Brr!
Friday, 4 June 2021
Pallet Pool, Part 1
How (not) to Build a Pallet Pool
My wife was bemoaning the summer ahead..."Covid restrictions, you'll be working, the kids and I will have nothing to do." So she ordered a pool. Our backyard is not too big...about 16 feet wide...so she ordered a 14' diameter pool on Amazon. However for whatever reason the company was not able to fulfill the order...so we were back with no pool. All pools that we looked for after that were either the wrong size or too shallow.
Her friend sent us a link or two about homemade pools. At first I was pretty skeptical - one of the links showed someone digging a big hole and lining it with a tarp. No thanks. But then I found a few sites that showed pallet pools. Pallets are free all over the place. With the cost of lumber skyrocketing, it seemed like a good fit...
I found some pallets on Craigslist. They were all the same size (44"x56"). I figured, go big or go home, let's make a pool that we can actually swim in instead of a dinky 8 foot circle, so I picked up two truckloads and set them up.
(Ironically, that is our 'pool table' in the middle there...)
Once I had a basic design (elongated octagon) it was time to dig. Our backyard had a slight slope so more dirt needed to be removed on one side than the other. I wanted the pallets to be set slightly into the yard to keep them from moving around, but I was too lazy to dig deeper than a shovelful...we dug about 8 inches on one side and 3 or 4 inches on the other.
Once the ground was fairly level, with piles of dirt all around, I bought half a yard of gravel (crusher chips) and carried it one bucket at a time, through our townhouse (we don't really have backyard access), to the back, dumped it out, and Kate smoothed it out with a rake. There was only a couple of inches of gravel at the most, but it was enough to pack down and give us a solid, smooth-ish foundation. Levelling is very important because a pool is unforgiving when it shows you if you are out of level. Water is a built-in level! I taped a 2-foot spirit level to a long stick and scraped it around for awhile until I was satisfied.
Next I set up the pallets. I screwed them together with a few 3" deck screws, mostly so they wouldn't fall down, not for any structural reason. I set them on the gravel and then later bought more gravel to fill in the space behind the pallet. The main reason for using gravel instead of earth was to hopefully help with drainage--I didn't want the pallets to rot too quickly in the ground. I did pile on the dirt after a few inches of gravel, however. And that is it for part 1. It was a fair amount of work on some hot days; looking forward to getting it done! And so far it cost about $40 for gravel...so cheap, what could go wrong???
Subscribe to:
Comments (Atom)


